
Giving somebody a blanket is one of the nicest gifts I can think of. Blankets provide warmth and comfort, it’s basically like giving away a permanent hug. Even better if the blanket is handmade with love.
I was absolutely thrilled when I learned out how to crochet edges around fleece blankets. You get to combine lovely fabrics and cool prints with your favourite crochet stitches and colour combinations, to make beautiful comfy blankets for your loved ones.
Follow the steps in this tutorial to create your own blanket with a crochet edge.
Step 1: Find the right fabric and matching colours
Now, this is where the fun begins. You can choose any colours and patterns that you, or the person you are making it for, like. You can choose modern graphic patterns or romantic flower ones, superheroes or unicorns. Wait, did somebody say unicorns?

Normally, the fabric you choose will give you an idea about the yarn colours you want to go with. I like to choose 3-4 colours that can be found in the details of the fabric. But you could also imagine using contrasting or complementary colours from the opposite end of the colour wheel, for example, yellow edges for a purple blanket, or colourful edges around a black and white pattern.
When it comes to yarn weight, I would go with a yarn made for a 4-5mm hook (sizes G-H). For the project in the pictures, I chose quite a bulky cotton yarn, because I really like the contrast in textures between the soft fleece and the firm cotton.
Step 2: Making the foundation
Now that you have your fabric and your yarn all sorted, you need to crochet a foundation row on which you can create your edge, for that you’ll need to make some holes in the blanket… yikes.
Depending on how thick your fabric is, you can either use a rotary cutter or do this by hand. A rotary cutter will allow you to cut small holes in fixed distances into the fabric so you can crochet into them. This works well on most standard fleece fabrics.
The unicorn fabric I chose was actually more like plush – extra warm and cuddly – which turned out too thick for my rotary cutter. So when I tried cutting holes in it, it basically just cut off an entire strip. Not cool!
So I took a thin hook (3mm / size C-D) and punched the holes in by hand, making single crochets as I went along. I measured the distance between stitches (approximately) with my fingertips to try to get an even spacing.
No matter which hole-punching technique you use, for your foundation row you will make a single crochet into the blanket, followed by a chain. So you want to single crochet, chain, single crochet, chain, single crochet, chain and so forth, all the way around like in the picture below. Finish on a chain 1 and join to the top your first single crochet with a slip stitch.

Step 3: Go wild!
Once you have completed your foundation row, you can start getting creative for your edging. I was inspired by the classic granny stitch for my unicorn blanket.
The granny stitch goes as follows:
Row 1: chain 2, 2 double crochets into same stitch, chain 1, *3 double crochets into chain 1 from the previous row, chain 1* repeat all the way around. Join to top of chain 2 with a slip stitch.
Row 2: chain 2, *3 double crochets into chain 1 from the previous row, chain 1* all the way around, finish on a 3 double crochet and join to your beginning chain with slip stitch.
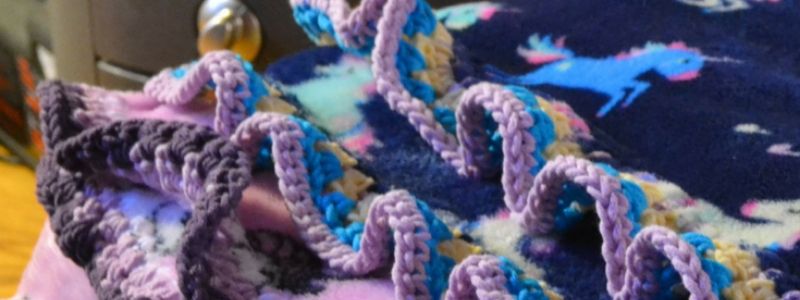
I tried this for my unicorn blanket but found that, due to the firmness of the cotton yarn, my edge looked nicer when I did 2 double crochets instead of 3.

This already makes for a lovely edge. If you wanted to add another colour, you could add either another “granny row” or a finishing row of single crochets.

When it comes to crochet edges, there is no limit to your creativity. I hope you’ll enjoy making your own blankets!
Looking for more crafty goodness?